|
|
|
Kool
Clip-Art Kool Moves and Flash - Related
Tutorials
|
|
All
.fun files presented on this site are original works made with Kool
Moves © 2004 Propellerhead-Graphix, PO Box 14, Capac, MI, 48014
|
|
|
The tutorial above may involve the use of some actionscript, html, and the like, but are not necessarily intended to teach them. These tutorials are intended to familiarize new users to the Kool Moves interface and contain simplified examples of how to perform specific tasks in Kool Moves as they would relate to the use of materials from this site. Suggested examples contained within these tutorials may not necessarily be the "best" way to accomplish a task, but they do accomplish the job at hand. These tutorials are not an attempt to copy already existing tutorials. In some instances, more detailed tutorials on actionscript and the use of the Kool Moves tool are available at the Support page on the Kool Moves web site.
Import Text into Kool Moves
Importing the contents of a Text File into a Kool Moves Movie.
This tutorial will show you how to import the contents of an external text file into a Kool Moves Movie. Following the steps below, we will first create a standard text file, create a variable and assign some text to that variable, then create a movie that can read the text file, recognize the variable, then import and display the text. Before we continue, it is important that you understand the concept of variables and how they are used in Flash movies. The simplest way to explain variables is as follows: The definition for a variable is something that is changeable. For our tutorial below, our variable will be the text within the text file that we create. The text is a variable because it is changeable - or in other words, it can be changed by editing, which in turn will change the text displayed within your movie.
The first thing we need to do is to create a standard text file that will contain our variable. So open NotePad (or whatever application you have to make text files) and type in the following line of text exactly as it appears below:
&text=This text is a variable that will appear in my new Kool Moves Movie.
Now, name the file as text and save it to a folder on your hard drive (My Documents is good). (It is important that you save this file as a plain text file (.txt), as other text file types will not be read properly.)
Note: The first word you typed was "&text". The & defines the words that follow as a variable. The word text is the name of the variable that we are going to later pass to your Flash movie, followed by an "=" sign which indicates the contents of the variable (the text that you want to appear in your movie). When importing variables, Flash looks for the & prefix in order to distinguish between what is and what is not a variable. This is especially important when dealing with multiple variables. As our example only contains 1 variable (text), if we left off the & prefix, the text would still be treated as a variable. However it is good practice to use the & prefix here.
Now, we will create a 2 frame movie in which to display our line of text. Open a new, blank movie in Kool Moves. At the bottom of the stage, click on the (+) symbol (shown below) to add a second frame to your movie.
Click the (+) symbol to add a second frame to your movie.
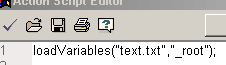
Select the first frame of your movie, click View > Actions and Sounds Overview to open the Actions and Sounds dialog, in the dialog box highlight frame 1 under Key frames, click the (+) symbol, select Action Script from the drop down menu to open the Action Script Editor.and type in the following line: loadVariables("text.txt","_root"); (shown below). An AS will appear next to frame 1 in the Actions and Sounds dialog to indicate that frame 1 now contains actionscript.
Note: loadVariables instructs the movie to load any variables from a given location (in this case, your hard drive). "text.txt" is the name of the text file that contains the variable we want to load. "_root" is a reference to the root movie Timeline. If a movie has multiple levels, the root movie Timeline is on the level containing the currently executing script.
Keeping the Actions and Sounds dialog open, in the dialog box highlight frame 2 under Key frames, click the (+) symbol, select Action Script from the drop down menu to open the Action Script Editor.and type in the following line: stop(); (shown below), click OK to exit the editor. An AS will appear next to frame 2 in the Actions and Sounds dialog to indicate that frame 2 now contains actionscript.
On the editing stage, go to frame 2 of your movie, select Text > Dynamic Text from the Toolbox (shown below).
Note: You need to tell the movie to stop. Otherwise it will keep looping and your text will flash on and off.
Now drag the cursor across the stage to create a dynamic text box large enough to accomodate your text (the line of text you created in the text file earlier). As you drag the cursor, a bounding text box will appear representing your dynamic text box (as illustrated below)
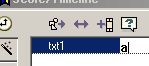
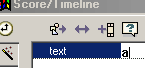
Next, click Views > Score/Timeline from the main menu to open the Score/Timeline dialog. Right-click txt1, choose Rename, and change the name to text
Note: Dynamic Text means we are getting the text from another source (the variable) and it is capable of being changed (as opposed to static text that just sits there doing nothing). The "txt1" on the Timeline is the name that Kool Moves assigns to the variable by default. It MUST be changed to "text", the same name as the variable that we entered in our text.txt file from step 1.
From the Kool Moves Help File in reference to Flash 6: With Flash 6, dynamic text has both an instance (instance name refers to assigning a name for each time the dynamic text appears in the movie) and a variable name in the Flash authoring tool. Object attributes like 'text' and '_x' are associated with the instance name which in KoolMoves is the name of the object, e.g., txt1. The variable name is used for backward compatibility for assignment statements such as = "hello". The KoolMoves interface does not support both an instance name and a variable name because of the confusion associated with having two names for basically the same thing. KoolMoves automatically associates a variable name with all Flash 6 dynamic text objects as the instance name plus "var". For example, if the name of a dynamic text object is txt1, when exported as Flash 6 the variable name is txt1var and the instance name is txt1. For a Flash 4 and 5 exported dynamic text object named txt1, the variable name is still txt1.
Now, click File > Save As to save your movie as a .fun file. (Name it whatever you want.)
After you name your .fun file, click File > Export Movie > As SWF (Flash Movie) and save it as an .swf file in the same folder as your text file.( To be read, the text file must be in the same folder as the .swf file.)
Now you are ready to test your movie. Open the folder to which you saved your .swf, Open the .swf and you should see the following line of text:
This text is a variable that will appear in my new Kool Moves Movie.
Note: Remember in step 4 we learned that loadVariables instructs the movie to load any variables from a given location. Right now the variable being loaded to your movie is coming from the following location: the text file that you placed into a folder on your own hard drive. When you upload your files to the web, you are changing their location. In order for the text file to be read when you place it on the Web, you must place both files in the same directory and, depending upon how your server locates files, you may also need to return to Step 4 to more precisely define the location of your variable. In other words, you may need to replace the location of "text.txt" with the absolute URL (exact web address) for your text file. If you place your text file in the root directory, an example of an absolute URL might look similar to:
http://www.mysite.com/text.txt.
Otherwise, you will have to write the url to the proper sub-directory in which you placed the file.
The message above should appear in your movie.
Note: The Properties for your Dynamic Text can be changed just like any other object in your movie by double-clicking the bounding box to open the Properties Dialog. From there you can change the font, style and size of the text, as well as set other properties such as Border, Read-Only, Text Selectable, Scroll Bars, HTML, etc.