|
|
|
Kool
Clip-Art Kool Moves and Flash - Related
Tutorials
|
|
All
.fun files presented on this site are original works made with Kool
Moves © 2004 Propellerhead-Graphix, PO Box 14, Capac, MI, 48014
|
|
|
In Kool Moves, there are two methods you can use to insert a movie clip into your main movie. The least confusing is to use Shapes > Add Movie Clip from the main menu. The other is to use the Movie Clip Button from the Toolbox to either insert a movie clip or to convert shapes into a movie clip. Both methods will be demonstrated below.
Understanding Movie Clips
Learn how to add Movie Clips in your Movies.
The tutorial above may involve the use of some actionscript, html, and the like, but are not necessarily intended to teach them. These tutorials are intended to familiarize new users to the Kool Moves interface and contain simplified examples of how to perform specific tasks in Kool Moves as they would relate to the use of materials from this site. Suggested examples contained within these tutorials may not necessarily be the "best" way to accomplish a task, but they do accomplish the job at hand. These tutorials are not an attempt to copy already existing tutorials. In some instances, more detailed tutorials on actionscript and the use of the Kool Moves tool are available at the Support page on the Kool Moves web site.
When you place a movie clip inside your main movie you are creating a relationship between two movies. The main movie becomes the "parent" and the movie clip becomes the "child". Complex movie structures can be created by nesting multiple movie clips inside the main movie and also inside one another. Subsequently, the parent - child relationship becomes particularly important when it comes to keeping track of and assigning actions to multiple movie clips.
Using the "Tell target" action, actionscript (not discussed in this tutorial) may be used to send instructions from movie clip to movie clip or to the main movie, or from the main movie to any movie clip within. The movie or movie clip where the action originates is called the controller, and the movie or movie clip that is affected by the action is called the target. A target path is specified in the action to identify the location of the movie or movie clip that you want to target with the action.
Now that you know a little about Movie Clips, it's time to learn how to use them. . This tutorial will not teach you everything about movie clips, but it will help you to better understand movie clip basics by showing you how to insert and edit them within your main Kool Moves movie (Using Movie Clips to create animated buttons will be discussed in a seperate tutorial coming soon.)
In order to use this tutorial, you will need a total of two movies. The lessons that follow require one animated movie clip and one main movie in which to insert the movie clip (In order to save time, both movies are provided below). Before you continue, click the Download Movies link to download the movies.zip and extract them to the My Documents folder on your computer.
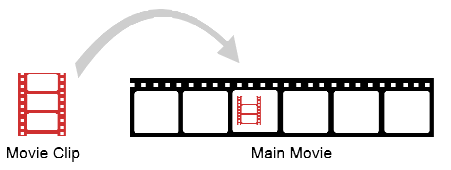
A Movie Clip is a mini movie inserted into a main movie
To begin, start Kool Moves and choose File > Open, then select the .fun file entitled main from the two files you just downloaded to My Documents. This is a movie of a walking man figure with 13 keyframes that will serve as your main movie into which you will insert a movie clip.
Essentially, movie clips (sometimes referred to as Sprites by other Flash rendering programs) are mini-movies that you place within your main Kool Moves movie (fig. 1). A movie clip is inserted as a symbol, has its own timeline, frames, properties (such as color, transparency, and rotation), can run independently from the main movie and other movie clips, and can start and stop on any frame, as well as move around the screen of the main movie. A movie clip can play across some frames, all frames, or play itself out entirety on a single frame of the main movie. Movie clips can contain animation, actions, buttons, and other interactive features just like the main movie. They can also be used as "over" and "down" states in the creation of animated buttons.
Converting Shapes into Movie Clips
Next, select frame 1 in the main movie. Now choose Shapes > Add Movie Clip from the main menu to add a movie clip to the main movie. The stage will now change, added to the top will be two buttons (shown below), one will say Main movie, the other will say Movie Clip mc1 and will be selected to indicate that you are now editing a movie clip. The stage will remain blank until you add some content to the movie clip.
At this point, you have two options to add content. You can either draw a new movie clip frame by frame, or you can insert a pre-made movie to use as a movie clip. (We are going to insert a pre-made movie.) From the main menu, select File > Insert Movie and choose the .fun file entitled clip from My Documents. This will insert a mini movie (.fun file) of a bouncing ball with 5 keyframes that will serve as your movie clip.
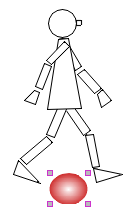
Now click on the Main button at the top of the stage to return to the main movie. You should see a figure of a man with a red ball at his feet (as shown below).
You have just inserted your movie clip onto frame 1 of your main movie. This movie clip can be made to play over only part OR the entire length of the main movie. (We are going to play it for the entire length of the main movie.) Remembering from above that movie clips are also symbols, what you need to do now is to copy "instances" of your movie clip symbol to the other frames in your main movie so that the movie clip may play over the course of those frames. With the red ball selected, choose Edit > Copy Shapes from the main menu, then select Edit > Paste Shapes to End to place a copy of the movie clip symbol to every frame in the main movie. Note that you now have two "instances", of the movie clip on frame 1. Delete the first instance and leave the copy in its place.
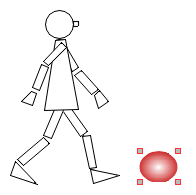
Now, with the red ball still selected, from the main menu, choose Shapes > Selection Scope > All Frames, and move the red ball to the right side of the man (as shown below), then change the Selection Scope back to This Frame.
Delete Instance 1 and leave Instance 2 where it is.
Choose Play > Play in Web Browser to test the movie. You should see the red ball bouncing up and down next to the walking man. If you are satisfied with the results, choose File > Save As to save the movie. if not, review the above steps and make the necessary corrections before you continue.
One of the "Koolest" features of a movie clip is that it can run on its own timeline, independent of the main movie. Using various actions, special and dramatic effects can be achieved through the insertion of movie clips, each running on their own timeline. Now for the demonstration.
For editing purposes, on the main stage a movie clip is similar to a symbol. You may select it, move it around, copy it, paste it to other frames, etc. The only noticeable difference is the blue/gray shading of it's corners when selected (shown below).
In addition to inserting pre-made movie clips, shapes drawn in your main movie may be converted into movie clips. Here's how:
Keeping the main movie open, from the main menu Select Views > Actions and Sounds Overview, then highlight frame 7 from the list of frames. Next, click the plus symbol (+) to access the actions menu, choose Go To Frame, select Key Frame, then choose keyframe 7 from the dropdown, choose and Stop for the action, then click OK. What you just did was to stop the main movie on Frame 7.
Now, from the main menu, choose Play > Play in Web Browser to test the movie. Notice anything? The Walking man stops while the red ball (your movie clip) keeps playing because it is on its own timeline. This stop and go action can be further controlled by buttons and actionscript using the "Tell target" action mentioned above.
Selected Movie Clip Symbol
Double Clicking on a movie clip will open the properties dialog. Notice that the properties dialog for a movie clip symbol differs from that of a regular symbol. The movie clip dialog shows two buttons, one to denote that is is a symbol, and the other to denote that it has frames (illustrated below).
Movie Clip Symbol Dialog Box
To access the stage for editing your movie clip, click the Frames button on the Movie Clip Symbol dialog box.
Now you can edit your movie clip in the same manner as any other movie. When you are finished editing, click the Main button at the top of the stage to return to the main movie.
Simply choose any frame from your main movie (typically the first frame on which you want your movie clip to start) and draw in the shape (or shapes) that you want to become your movie clip. Then copy those shapes to all of the frames in your main movie on which you want your movie clip to appear.
Now, select the shapes, and choose Convert to Movie Clip from the Tool box (shown below).
Before you convert the shapes to a movie clip, determine the composition of your movie clip (how many frames on your main movie you want your movie clip to appear on), then choose Shapes > Selection Scope from the main menu to select your setting. (Note that selecting All Frames will convert those shapes for all frames in the main movie in which those shapes are copied to).
At this point, you can use steps 9 and 10 from above to access the Properties dialog to edit your movie clip.
After you edit, choose Play > Play in Web Browser from the main menu to preview your movie, then save it if you are satisfied with the results.
The following tutorial will be available soon: Using Movie Clips to create Animated Buttons
Note: For this exercise we are using a mini-movie that has NOT been saved as a movie clip prior to insertion to the main movie, therefore we must use the Add Movie Clip feature explained in step 2 in order to convert it into a movie clip. If, in the case that a mini-movie has already been saved as a movie clip prior to insertion to the main movie, you do not need to convert it, therefore you may skip the Add Movie Clip feature in step 2, and directly use the Insert Movie feature in step 3.
While movie clips do run on their own timelines, seperate from the main movie, you should take note that when you insert a movie clip, Kool Moves re-sets the number of default tweens to match that of the main movie. This will alter the original timing of the movie clip. To correct this, you will have to re-set the tweens for your movie clip once it is inserted. To re-set the tweens you will have to access the frames for the movie clip through the Properties dialog and reset each frame individually using the dialog provided at the stage bottom. Not only can you restore your original tween setting if desired, but you can also tweak the speed of your movie clip using this method. In the steps that follow, we will adjust the tweens on our movie clip to speed up the action.
Continuing to use our movies from above, in the main movie, click Frames > Default Tweens from the main menu and note the number setting. Now on the stage, double click the movie clip (red ball) to open the properties dialog, click the Frames button, then click Frames >Default Tweens and note that the settiing is the same for the movie clip as the main movie. (Kool Moves has re-set the default tweens of the movie clip to match those of the main movie.)
Using the tween number dialog at the bottom of the stage (shown below), navigate to each frame within the movie clip and re-set the tween for each frame to (0).
Now, navigate back to the main movie and choose Play > Play in Web Browser from the main menu to test the movie. What happens? The red ball should be bouncing much faster than it was before. You have just increased the speed in which the movie clip plays.


