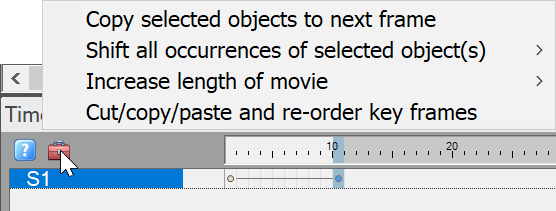
Timeline
I would say that a timeline is common to all animation software. It provides a visual display of the stage elements in each frame of the movie and much more depending on the specific product.
A simple example of a timeline is shown below. In this example, the horizontal line bounded at each end by a circle (which we can call anchors) indicates that S1 object (whatever it is) is present in key frames 1 thru 10 and that the instance of S1 in key frame 1 is morphed to the instance in key frame 10. The connectivity between the instances at the two end points is defined by a motion path, linear or curved (quadratic). More about motion paths here.

S1 instance can be edited in key frames 1 and 10 and is present in a virtual sense in the key frames in between. The software morphs all the properties of S1 (position, color, gradient if present, bitmap if present, vertices if present, scaling, and rotation angle) between the end point instances. Maybe none of its properties change between those key frames. The motion path is still a useful representation instead of the following which also indicates that S1 is in every key frame between key frames 1 and 10.

In this example, the instances of S1 are explicitly present in key frame 1 thru 10 and can have different properties in each key frame. If no properties change, both representations result in identical html files.
Let's consider a more complicated case (shown below). S1 is not present in key frame 1. There is an intermediate anchor point at key frame 5. So in other words, S1 is present on the center movie stage at key frame 2, key frame 5, and key frame 10. Properties of S1 in key frame 2 are morphed to the properties of S1 in key frame 5. Similiarly, properties of S1 in key frame 5 are morphed to the properties of S1 in key frame 10.

At this point, it would be appropriate to discuss the mechanics of populating the timeline and movie itself. There are a couple of good videos on adding stage elements to the movie:
- Addding Objects to the Stage
- Text: Addding, Morphing, Applying Effects
- Creating a Multi-Scene Animation with Navigation
To add a stage element to a specific key frame, navigate to that key frame first. The center movie stage displays the rendered elements for that particular key frame. If the movie is comprised of multiple key frames at this point, on adding a text object or whatever you will be asked if you want to add it to only that key frame, all key frames, etc. Selected objects can be cut from one key frame and pasted into a different key frame. As an aside, there are a multitude of ways to select an object (or more than one object) on the stage -- click on it on the stage, lasso it with the mouse, click on the corresponding circle on the timeline, select it in the Objects in Current Frame popup or in the Movie Overview popup.
One of the easiest ways to extend a stage object to other key frames and even to increase the length of the movie is by right-clicking on a key frame to the right of the current selection and selecting Morph to Key Frame.

This results in the current selection being morphed to a new instance of the object in the key frame just clicked on and connected with a linear motion path (which can be changed in the Properties pane) as shown below (which happens to be the first image in this article).
A simple way to move selected blue circles along the timeline is to depress the mouse until a box appears around the selection and then drag the mouse.

To move or copy stage elements to other key frames you can utilize the operations available by clicking on the toolbar box icon.
Or by right-clicking in the list of stage elements or on one of the blue-filled circles in the main part of the timeline.
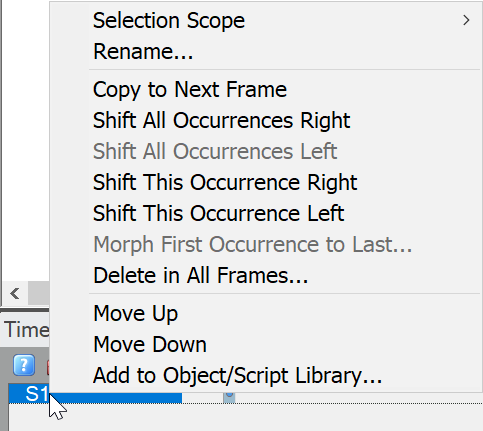
You can also use standard cut/copy/paste operations on selected items on the stage to affect other key frames.
The term "key frame" has been used so far in this article rather than "frame". This software makes a distinction between animation frames (or tween frames) and key frames. Tween frames are frames between key frames. In the days prior to computers, the master animator would draw the shapes in each key frame and the apprentice animator would draw shapes in the "in between" frames to achieve smooth motion.
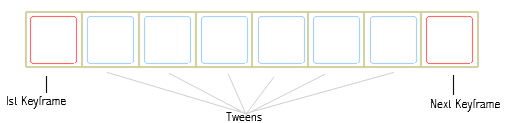
It is my impression that most animation software doesn't make this distinction. By working with key frames, it makes the timeline more manageable. Otherwise, the timeline can extend horizontally by a factor of 10 or so (i.e., the factor being the number of tweens per key frame). The idea is that key frames are where the major changes are occurring and the tweens between the key frames smooth the action and add bulk to the movie. The software automatically generates the tween frames that are exported for the final html file and for previewing the movie, taking into account the morphing between adjacent key frames, to provide smooth animated motion. It is quite easy to make key frames into tween frames by setting the number of tweens for each key frame to zero.
One way to set the number of tweens for the current key frame is shown below. Click on the clock icon. The popup lets you set the tweens as a number or as elapsed time. Default tweens for the movie can be set using this popup or by selecting menu item Frames > Default Tweens from the top menu bar. Another way to set tweens is with the List of Key Frames popup (the icon to the left of the tweens display).
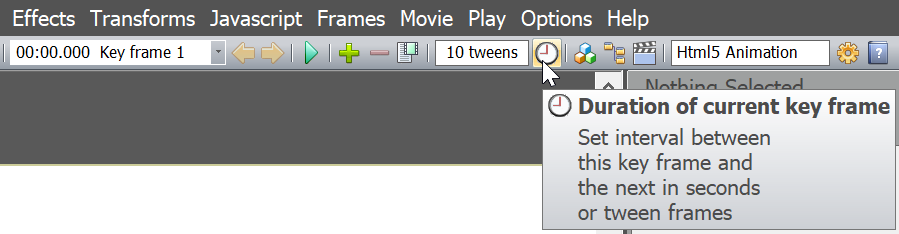
Other icons on the top toolbar are worth mentioning because they relate to the timeline. At the left of the image is a drop down combo box of all the key frames with their start times. To the right of that are left and right arrows which provide easy navigation for moving to the previous or next key frame. To the right of that is a play button for previewing the movie. To the right of that are icons for adding key frames to the movie (plus icon) and deleting the current key frame (minus icon).


